Monday, October 28, 2013

Search Service Application Error On Creation SharePoint 2010

While Creating Search Service Application I got the below error.
I googled 5 hours for this error and most of the blogs/posts recommends to delete and recreate SearchServiceApplication, but no luck,  at last got the solution.
Errors were encountered during the configuration of the Search Service Application.
System.Data.SqlClient.SqlException: Windows NT user or group ‘SP\administrator’ not found. Check the name again. at System.Data.SqlClient.SqlConnection.OnError(SqlException exception, Boolean breakConnection) at System.Data.SqlClient.TdsParser.ThrowExceptionAndWarning(TdsParserStateObject stateObj) at System.Data.SqlClient.TdsParser.Run(RunBehavior runBehavior, SqlCommand cmdHandler, SqlDataReader dataStream, BulkCopySimpleResultSet bulkCopyHandler, TdsParserStateObject stateObj) at System.Data.SqlClient.SqlCommand.FinishExecuteReader(SqlDataReader ds, RunBehavior runBehavior, String resetOptionsString) at System.Data.SqlClient.SqlCommand.RunExecuteReaderTds(CommandBehavior cmdBehavior, RunBehavior runBehavior, Boolean returnStream, Boolean async) at System.Data.SqlClient.SqlCommand.RunExecuteReader(CommandBehavior cmdBehavior, RunBehavior runBehavior, Boolean returnStream, String method, DbAsyncResult result) at System.Data.SqlClient.SqlCommand.InternalExecuteNonQuery(DbAsyncResult result, String methodName, Boolean sendToPipe) at System.Data.SqlClient.SqlCommand.ExecuteNonQuery() at Microsoft.Office.Server.Data.SqlSession.ExecuteNonQuery(SqlCommand command) at Microsoft.Office.Server.Data.SqlServerManager.GrantLogin(String user) at Microsoft.Office.Server.Search.Administration.SearchDatabase.GrantAccess(String username, String role) at Microsoft.Office.Server.Search.Administration.SearchDatabase.SynchronizeAccessRules(SearchServiceApplication searchApp) at Microsoft.Office.Server.Search.Administration.SearchServiceApplication.SynchronizeDatabases() at Microsoft.Office.Server.Search.Administration.SearchServiceApplication.Provision() at Microsoft.Office.Server.Search.Administration.SearchConfigWizard.b__22() at Microsoft.Office.Server.Search.Administration.SearchAdminUtils.UpdateIgnoreSPUpdatedConcurrencyException(String description, SearchAdminUtilsUpdateDelegate updateDelegate, SearchAdminUtilsRefreshObjectDelegate refreshObjectDelegate) at Microsoft.Office.Server.Search.Administration.SearchConfigWizard.CreateSearchApp() at Microsoft.Office.Server.Search.Administration.SearchConfigWizard.ProvisionSearchServiceApplication() at Microsoft.Office.Server.Search.Administration.SearchConfigurationJobDefinition.ExecuteTimerJob()

Reason:
The reason for this error is that Windows NT user or group ‘SP\Administrator’ not found where SP is my domain.
I went to SQL Server Management Studio and noticed that login for ‘SP\administrator’ account had not been updated to ‘SP\Administrator’.   It read as SERVERNAME\Administrator …. the account used before setting up AD on that machine.

Solution:
Logged into SQL Server Managment Studio
Navigated to the Security folder
and renamed SERVERNAME\Administrator to ‘SP\Adminsitrator’ to ensure this account had the appropiate name.
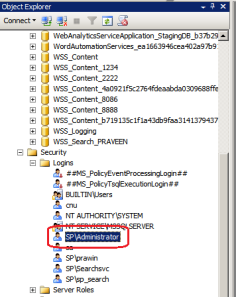

Note: Also make sure that SP\Administrator has the following roles
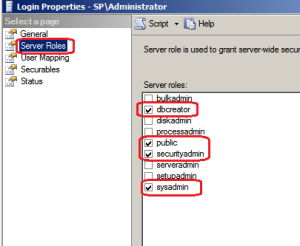

That solved my problem and Search Service Application has been created..:)
Other Possible Reasons:
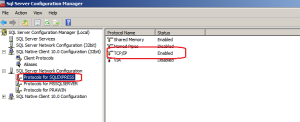
1. I checked TCP/IP enabled in SQL server Configuration Manager.


2. Also Checked SharepointServerSearch status  has been started in Central Administration–> Services on Server .


About these ads

Sunday, October 27, 2013

SharePoint PowerShell Script Feature Activate and Deactivate


1) Run script in windows power shell first run line

Add-PSSnapin ‘Microsoft.SharePoint.PowerShell’


2) Deploy webpart  using power shell
 Add-SPSolution “D:\Deploy\MySharePointSolution.wsp“

Install-SPSolution –Identity MySharePointSolution.wsp –WebApplication http://myspwebapp –GACDeployment

If you would like to add the solution as sandboxed, you would use the Install-SPUserSolution command instead. To upgrade a solution, we specify which solution is to be updated and with which new solution file:

Update-SPSolution –Identity MySharePointSolution.wsp –LiteralPath “D:\Deploy\MySharePointSolution.wsp” –GacDeployment

To retract and remove a solution, we use the following commands:

Uninstall-SPSolution –Identity MySharePointSolution.wsp –WebApplication http://myspwebapp
Remove-SPSolution–Identity MySharePointSolution.wsp

Enable-SPFeature –Identity MyFeatureNameOrGuid –url http://myspwebapp
Disable-SPFeature –Identity MyFeatureNameOrGuid –url http://myspwebapp


Listing features on Farm, Site Collection and Site

The main cmdlet used within powershell to list features is the Get-SPFeature cmdlets. To show all the features on the farm listed by display name and sorted use this:


Get-SPFeature | Sort -Property DisplayName

To show all the features on the Farm grouped by scope in a table use:


Get-SPFeature | Sort -Property DisplayName, Scope | FT -GroupBy Scope DisplayName

To see all features for a Web Application:


Get-SPFeature -WebApplication http://webapplication

To see all features for a Site Collection:


Get-SPFeature -Site http://sitecollection

To see all features for a Site:


Get-SPFeature -Web http://siteurl

Remember for some more information relating to the features you can use:


Get-SPFeature -Web http://siteurl | Format-List

To see all the members that a feature definition has use:


Get-SPFeature -Web http://siteurl | Get-Member


Enabling and Disabling Features

To disable and enable features is all pretty easy once again using the Disable-SPFeature and Enable-SPFeature cmdlets but there is a trick. You need the name of the feature folder that contains the actual feature not what is displayed in the UI so be careful:


Enable-SPFeature -Identity "Hold" -URL http://url


You can apply this to any Site and Site Collection scoped features.
Obviously to disable a feature just use the same syntax but with the Disable-Feature cmdlet


Disable-SPFeature -Identity "Hold" -URL http://url

Remember though that the -Identity is the DisplayName property of the feature, not the text displayed on the UI which is actually retrieved from a resources file.
For example the Document Sets feature looks like below in the SharePoint interface:


But to actually enable it you have to use the following cmdlet:


Enable-SPFeature -Identity DocumentSet -URL http://url

Installing and Uninstalling Features

Once again this is pretty straight forward and is really made up of only two cmdlets: Install-SPFeature and Uninstall-SPFeature

To install a feature you need to specify the name of the folder that your feature contains:


Install-SPFeature "FeatureFolderName"

To uninstall simply use the same Uninstall-Feature command with the same parameters:


Uninstall-SPFeature -Identity "MyCustomFeature"

Monday, October 21, 2013

SharePoint 2013 Best Bets Search Promoted Results

In this blog I will explain step-by-step how to create a promoted result in SharePoint 2013
Step 1: Where to find the promoted results
You will first need to go to Central Administration and open Manage Service Applications. Once you have opened you will have to select Search Service Application which is a place you are familiar with if you ever worked with Search in SP2010. Once you have opened the Search Service Application you will need to select Query Rules like I have shown in the picture to the right.


Figure – 1

Step 2: Create a Query Rule
Once you have opened the Query Rules Page you must now select a context source to create your rule. You will have the option to test your query on this page once you select a source for your rule.


Figure – 2

Next you will need to select New Query Rule like I have highlighted in the picture above. On the Add Query Rule page you will enter the rule name and specify the exact phrase for the promoted result. This is similar to adding keywords for best bets in SP2010. You will also have an option to put a start and end date on this promoted result if it time sensitive material you only want to promote for a certain amount of time.


Figure – 3

Step 3: Add Promoted Result
The last step is to add the promoted result to this query rule. Under Actions section on the Add Query Rule page you will need to select Add Promoted Result. On this page you will add the title of the result and URL for the item you want to link to the promoted result. You also have an option to add a description to show up under the title when result comes back in search. If you ever spent any time creating a best bet in SP2010 this page will look very familiar to you.


Figure – 4

Once you save the changes, the promoted result should be created and ready to use like my example below. You will notice that they have replaced the starred result from SP2010 with a check mark but it is still brought to the top of the result list.


In this blog I will explain step-by-step how to create a promoted result in SP2013.
Step 1: Where to find the promoted results
You will first need to go to Central Administration and open Manage Service Applications. Once you have opened you will have to select Search Service Application which is a place you are familiar with if you ever worked with Search in SP2010. Once you have opened the Search Service Application you will need to select Query Rules like I have shown in the picture to the right.
space

david 1

Figure – 1
space
Step 2: Create a Query Rule
Once you have opened the Query Rules Page you must now select a context source to create your rule. You will have the option to test your query on this page once you select a source for your rule.
space

david 2

Figure – 2
space
Next you will need to select New Query Rule like I have highlighted in the picture above. On the Add Query Rule page you will enter the rule name and specify the exact phrase for the promoted result. This is similar to adding keywords for best bets in SP2010. You will also have an option to put a start and end date on this promoted result if it time sensitive material you only want to promote for a certain amount of time.
space
david 3
Figure – 3
space
Step 3: Add Promoted Result
The last step is to add the promoted result to this query rule. Under Actions section on the Add Query Rule page you will need to select Add Promoted Result. On this page you will add the title of the result and URL for the item you want to link to the promoted result. You also have an option to add a description to show up under the title when result comes back in search. If you ever spent any time creating a best bet in SP2010 this page will look very familiar to you.
space
david 4
Figure – 4
space
Once you save the changes, the promoted result should be created and ready to use like my example below. You will notice that they have replaced the starred result from SP2010 with a check mark but it is still brought to the top of the result list.
space
david 5
Figure – 5 
- See more at: http://www.surfray.com/blog/2013/05/30/promoted-results-in-sharepoint-2013/#sthash.PRPjejLr.dpuf