Monday, January 5, 2015

Sharepoint 2013 Create Calander overlay

The first step is to set up your Calendar with the appropriate metadata Column or Columns so that each event may be categorized. The Calendar has a built-in Category Column; you may wish to use this, or use it with modifications. You might also set up your own Column. For example, you might wish to categorize items on a Calendar based on the department or workgroup it belongs to. For the example below, though, I will modify the default Category Column.
  1. On the page for the Calendar you wish to work with, click the Calendar tab, then click List Settings.

  2. In List Settings, click the Category Column.
  3. Choose Yes for Require that this column contains information. Update the choices under Additional Column Settings, and change the setting for Allow Fill-in Choices to No

  4. Click OK.
Once the Column has the desired options, update the existing Events to include the correct Category. (If you have many Events to edit, you may want to add the Category Column to the All Events View, then use Datasheet View to quickly edit each item.)
Any new Events will be categorized as they are created.

Create Views

When all the relevant Events have Category data, you can then build a View to show only that Category.
  1. In the Calendar tab, click Create View.
  2. You want to copy the default Calendar View and make a small change to it to add a filter. On the Create View page, click Calendar under Start with an existing view.
  3. On the Create Calendar View page, type a name in the View Name field (i.e., Meeting Events).
  4. In the Filter section, add settings to show only Events where the Category is Meeting. (Be careful to type the criteria exactly as it appears in the Column, including the correct case.)

  5. Click OK.
You now have a View of the Calendar that shows only the items that have Meeting as the Category. Repeat this process for each of the other choices in the Category Column. You will end up with Views for HR, Social, and Training as well as Meeting.

Create Calendars Overlay

Now all the elements are in place for you to apply colors to each type of event, based on the Views you just created.
  1. On the Calendar tab, click the Calendars Overlay button.
  2. On the Calendar Overlay
    Settings page, add the Calendars (or in this case the Views of this Calendar) you wish to see by clicking the New Calendar link.
  3. On the New Calendar page, type in a name for the Calendar (in this case, a View of the same calendar).
  4. Choose a color for this Calendar View. (The colors available will depend on the theme or color scheme for the site as a whole.)
  5. Next, SharePoint needs to know the URL of the site (or subsite) for the Calendar. By default, it fills in the URL of the subsite you are working with. In this case, that is correct. If you were trying to bring in a Calendar from another subsite, you would type or paste in that URL. With the correct URL in place, click the Resolve button.
  6. When the URL resolves, the List field just below will be populated. From this drop-down, choose the Calendar you are working with. There may be only one selection if there is only one calendar on this subsite.
  7. Next, choose the specific View you wish to use in the List View field.
  8. Click OK.
  9. You will be returned to the Calendar Overlay Settings page, where you’ll see the calendar addition.
  10. Repeat these steps to add the Calendar Views for HR, Social, and Training, choosing a different color for each.
  11. Return to the Calendar. Now each type of Event has its own color. In addition, you can use the buttons on the left to show only one type of Event at a time. There’s a lingering problem, though … each Event is listed twice, since the Calendars Overlay layers the other Calendars/Views on top of the Events that already show in the normal Calendar View. Therefore, we’ll need to tweak the normal Calendar View to hide the duplicates.
  12. In our Calendar, every item will have a Category; that Column will not be blank in any instance. Therefore, it will be easy to hide the Events in the default View with a Filter that is looking only for uncategorized items. To do this, go to the View selector in the navigation breadcrumb and choose Modify this View.
  13. In the Filter section, make selections to build a filter where the Category – is equal to – [blank].
  14. Click OK.
  15. You will be returned to the Calendar with the Calendar View and the Calendars Overlay active. Since there are no Events in the normal Calendar View that have a blank Category, all items are hidden, but the overlaid views for each Category are visible with the color coding.
    color-code events on a SharePoint Calendar
So, while it takes a little effort to color-code events on a SharePoint Calendar, the end result can make users very happy. Calendars Overlay can be used for even more fancy display tricks. In my next blog post, I’ll show how it can be used to show items from Libraries and Lists other than Calendars.
Display templates to feature new search results in SharePoint 2013

For many versions of SharePoint, you have been able to configure the number of days the new indicator shows up on a document in a library.  For example, here is how a new document is indicated in a document library.
SearchDisplayTemplateDocumentLibraryNewIcon
I’ve worked with a number of user experience designers and they are always adding these new indicators to the search results wireframes.  Today we’ll look at a relatively simple technique to show this indicator on the search results screen.  I’ll assume you have some basic knowledge of display templates so I won’t go through all of the basics.  There are plenty of posts out there to help you get stared with that. 
For my example today, I wanted to show a new indicator for all documents regardless of what result type happened to be used.  This means we need to modify the file Item_CommonItem_Body.html.  Normally, the best approach for display templates is to make a copy of an existing one and then modify it.  However, we don’t have this option when we want to make the changes global.  My recommendation is to keep a working copy of this file somewhere before you make modifications.  However, if you really mess it up, you can always grab a working copy from another site collection. 
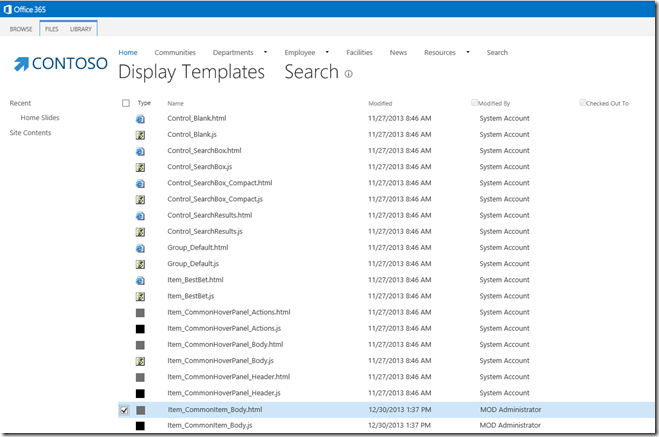
To modify the display template, go to the site collection hosting your search center and go to Site Settings.  Go to Master pages and page layouts and then navigate to the folder Display Templates –> Search.  Here you will find the Item_CommonItem_Body.html file.  You can either download a copy of the file or simply click the Library tab and look for the Open with Explorer icon.  From there we can edit the HTML file and make our changes.
SearchDisplayTemplateMasterPageLibrary
The Common Item Body file display a lot of the key fields that you see in all search results such as the title, hit highlighted summary, and URL.  We need to write a few lines of JavaScript.  We effectively want to determine the date associated with the file and compare it to another date to determine if the file is “new” or not.  In my case, I went with anything in the last 60 days.  I admit this is not very new but worked well for my demo content.  We’re going to set a new variable isNew and then use it later to display our new indicator.  Here’s the JavaScript.  I inserted this in the main script block just before the line starting with “var clickType” (around line 65).
var isNew = false;
var newDate = new Date();
newDate.setDate(newDate.getDate()-60);
isNew = ((new Date(ctx.CurrentItem.LastModifiedTime)) > newDate);
We’re going to add our new indicator right next to the Title of each search result.  To do this, look for the _#= titleHtml =#_ line.  We’ll add our code after that.  First create a JavaScript block to check if isNew is true.
<!--#_
            if (isNew) {
_#-->
Then we add the code to add our new icon.  In this example, I am using the same one from the document library.  I found the necessary HTML by using the IE developer toolbar.  One customization I made to this is that I added the LastModifiedTime to the title tag of the image so that you can see the date when you hover over the icon.
<span class="ms-newdocument-iconouter"><img title="New - _#= ctx.CurrentItem.LastModifiedTime =#_" class="ms-newdocument-icon" alt="New - _#= ctx.CurrentItem.LastModifiedTime =#_" src="/_layouts/15/images/spcommon.png?rev=31"></span>
Now we need to close our if statement with another script block.
<!--#_
            }
_#-->
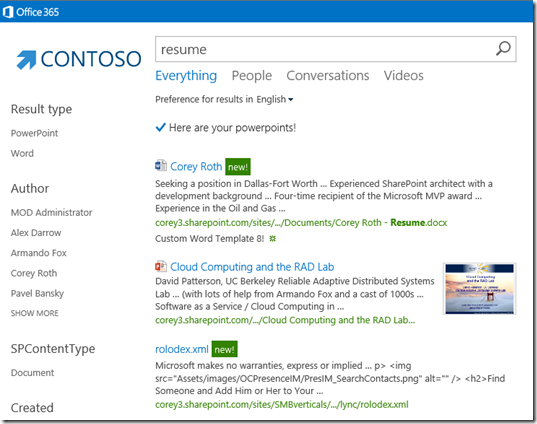
Now, we just need to save our file and see the results.  Execute another query from your search center and the items that are new should now be indicated.  In the example below, the resume and the XML file are new.
SearchDisplayTemplateNewIcon
I used the developer toolbar and replaced the HTML with the following.
<span class="ms-vl-recent ms-textSmall" id="recent-c831c747-a40d-4cb1-9e8c-3da27e089e19">new!</span>
Here is what it looks like now.
SearchDisplayTemplateNewText
You could even combine the two if you really wanted.  Use whatever works for you.  Now, what I will say about this technique is that search looks at the date the file was last modified and not the date that it was uploaded to SharePoint.  That means if you worked on a document offline and haven’t touched it in three months and then decide to upload it, it would not be considered “new”.

Configure SMTP on Windows Server 2008

Setup and Configure SMTP Server on Windows Server 2008 R2

There has been some confusion about how to setup and configure SMTP on Windows Server 2008 R2. The confusion has arisen due to the SMTP server component not being managed from with IIS 7.5 but is instead managed from the IIS 6 console.  In order to have SMTP working you must install IIS 6 as a feature. The following steps will explain how to setup and configure SMTP from start to finish.
Note: The steps for installing SMTP Server on Windows Server 2012 are very similar except for a few minor GUI changes.
Installing the SMTP feature
1. Click Start > Run and then enter servermanager.msc in the Open dialogue box then click OK to load Server Manager:
C:\>servermanager.msc
2. Use the Add Features Wizard to select SMTP Server on the Select Features page. To initiate this, right-click on Features and click Add Feature:
3. In the Features section check SMTP Server and click Next:
4. You may see a dialogue box like the one below stating that certain role services and features are required for SMTP:
5. Click Add Required Role Services and then you will return to the previous Features section. Ensure SMTP Server is checked then click Next.
6. In the Web Server (IIS) section, click Next to proceed to the Role Services section:
7. The Role Services should be pre-populated – IIS 6 Management Compatibility should be selected, and below it, IIS 6 Metabase Compatibility and IIS 6 Management Console should also be checked. Click Next to continue:
8. In the Confirmation section click Install:
9. In the Results section click Close to complete the installation of the SMTP Server:
Configuring the SMTP Server
The next step is to configure SMTP. To do so we will need to open Internet Information Services (IIS) Manager 6.
10. Click Start > Run and then enter inetmgr6 in the dialogue box then click OK to load IIS Manager 6.
11. In IIS 6 Manager right-click on SMTP Server and select Properties:
12. In the General tab, unless you want the SMTP Server to use a specific IP address,  leave the settings as they are so that the IP address is set to (All Unassigned):
13. To proceed, click on the Access tab:
14. Click on the Authentication button and ensure Anonymous access is checked and then click OK:
15. Once back in the Access tab, click on the Connection button. Select Only the list below and then click Add. Enter 127.0.0.1 as the IP addess and then click OK:
The Connection setting controls which computers can connect to the SMTP server and send mail. By granting only localhost (127.0.0.1) access, limits only the server itself the ability to connect to the SMTP server. This is a requirement for security.
16. Click OK to return to the Access tab and then click on the Relay button. Enter 127.0.0.1 as the IP addess and then click OK:
The Relay section determines which computers can relay mail through this SMTP server. By only allowing the localhost IP address (127.0.0.1) relay permissions it means that only the server itself can relay mail. Conversely, it prevents the SMTP server from being an open relay and being used to send unsolicited spam email by other computers on the internet, which could lead to the SMTP server being blacklisted.
17. Next, go to the Messages tab. Here you can enter an email address where copies of non-delivery reports are sent to. You can also configure the location of the Badmail director, however, the default setting should suffice:
20130427131034
18. Next, go to the Delivery tab:
19. Click on the Outbound Security button and ensure Anonymous access is selected. As the only server that can connect and relay mail through the SMTP server is localhost this security settings is fine:
20. Click OK to return to the Delivery tab and then click on Outbound Connections. Leave the defaults as they are:
21. Click OK to return to the Delivery tab and then click on Outbound Connections, then click on the Advanced button:
20130427131219
Here you will need to enter the fully-qualified domain name of the SMTP server. This will be the host name or A record that has been created in your DNS zone file. This is straight-forward to do but you will have to confirm how you do this with the party that manages DNS for your domain. I have entered mail.vsysad.com as this is fully-qualified. If you click on the Check DNS button you can confirm whether your chosen name resolves successfully. In my case it does as I see the following:
 22. Click OK and then OK again to exit the SMTP Virtual Server Properties.
You can also perform this test by running nslookup to confirm the existence of the host name as well as confirming the IP address it resolves to – which should be the IP address of your server:
20130427131924
Please note that DNS is crucial to successful email delivery. If your SMTP server cannot resolve the domains it is trying to send messages to then it will fail. Ensure that the DNS servers you have configured are able to resolve DNS queries successfully. From the above screenshot you can see that the DNS server I have configured, cachens2.dfw1.rackspace.com, was able to successfully resolve my SMTP server’s hostname, mail.vsysad.com. This is one of Rackspace’s many DNS servers and I am 100% confident it works fine.
The reason I am highlighting this is because if your SMTP Server sits within a corporate network it will likely use an internal DNS server. Often these are only configured to resolve internal namespaces therefore resolving external hostnames may fail. Also, firewall rules may block your SMTP Server from querying any DNS servers so please check and ensure DNS queries are resolved successfully and if not make sure it get fixed before going onto the testing phase below.
Another very important point about DNS is that you must ensure that you have a PTR record for reverse DNS lookups configured. The PTR record allows your SMTP Server’s public IP address to be resolved back to your hostname. Some of the major email providers perform revers DNS lookups of  mail servers connecting to them as a security measure to check their credibility or reputation. Your web host should have a control panel that allows you to configure reverse DNS if you have a dedicated public IP address. Not having a PTR record will not guarantee email delivery failure but it will very likely delay email delivery and at worst may result in your messages being blocked and your host being blacklisted. I highly recommend you you configure a PTR record for your server.
Follow the instructions in this post which shows you how to verify correct DNS configuration using the SMTPDIAG tool.
Testing the SMTP Server
The next step is to verify that the SMTP server is able to send email successfully. To do this follow the steps below:
23. Create a text file on your desktop called email.txt and paste the following into it, remembering to change the email address information to reflect your own details:
From: blog@yourdomain.com
To: email@yourdomain.com
Subject: Email test

This is the test body of the email
24. Save the changes to email.txt and then copy the file to C:\inetpub\mailroot\Pickup. The SMTP server monitors this folder and when it detects the email.txt file, it will read the contents and send the email to the address in the To: section. This should happen almost immediately.
25. Check the email address the email was sent to and it should arrive shortly – the email was sent to my Gmail account:
20130429184511
An alternative way of doing this is to use a script to perform the same email test. Simply save the code below into a file called email.vbs, remembering to change the email address information to reflect your own details:
Dim sch, cdoConfig, cdoMessage
sch = "http://schemas.microsoft.com/cdo/configuration/"
Set cdoConfig = CreateObject("CDO.Configuration")
With cdoConfig.Fields
.Item(sch & "sendusing") = 1 ' cdoSendUsingPort
.Item(sch & "smtpserver") = "127.0.0.1"
'    .Item(sch & "smtpserverport") = 25
.update
End With
Set cdoMessage = CreateObject("CDO.Message")
With cdoMessage
Set .Configuration = cdoConfig
.From = "blog@yourdomain.com"
.To = "email@yourdomain.com"
.Subject = "Email test"
.TextBody = "This is the test body of the email"
'.AddAttachment "c:\images\myimage.jpg"
.Send
End With
Set cdoMessage = Nothing
Set cdoConfig = Nothing
MsgBox "Email Sent"
 
Once the file has been saved to the desktop double-click on it and it
 should automatically send the the email. A message box pops up to 
confirm that the email was sent:
Apparently there’s more than one way to skin a cat, there’s also more ways to test your mail relay server:
You can also use telnet and PowerShell to test mail sending/routing via SMTP Server. Please refer to this post to see how to do this.
You can also use an email web form application which is similar to a contact us page on a website which allows you to post some feedback, which then uses an SMTP Server to deliver the messages to specific email contacts such as info@yourdomain.com that monitor this information. See this post to learn how to do this using an ASP.NET 4.0 C# email web form application.
That’s all there is to it! Now you have a fully functioning STMP server that can successfully send emails. Many of the companies that I have worked with use this method to send emails generated by their web applications.
If emails are not being successfully delivered you may notice that messages are building up in specific SMTP folders. Visit this post to understand the purpose of each SMTP folder and how to approach issues when messages are queuing up in those folders.

Sharepoint 2013 Display Template

Useful JavaScript to know when working with SharePoint Display Templates (#SPC3000)

With the display templates feature in SharePoint 2013, you can highly customize the look of search using HTML, JavaScript, and jQuery.  It turns out there are a lot of helper functions to make your life easier in the out-of-the-box scripts.  Unfortunately, there is not a lot of documentation out there on how to get started aside from looking at the code of OOTB display templates.  You can also find quite a bit by looking at the debug versions of the scripts Search.cbs.debug.js and Search.clientcontrols.js.

Meet ctx

When it comes to display templates, ctx is your content object for your display template.  With this object, you can get access to managed properties, the number of results, and DOM elements that make up your display template.  Your display template will have a reference to ctx automatically and you will need to pass it to many of the methods to get access.

Accessing the Current Item

Now that you have met ctx, you can use it to do a number of actions.  Use this in your item display templates and hover panels.
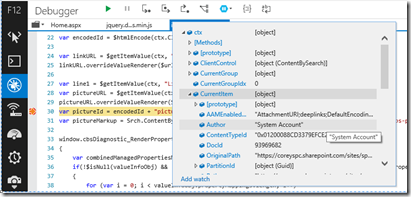
ctx.CurrentItem
This gives you access to all of the managed properties that have been set in the ManagedPropertyMapping element.  See below for the syntax to request the values.
DisplayTemplateDebuggerCtxCurrentItem
Get the index of the current item
var index = ctx.CurrentItemIdx;
An item display template gets called for each result you have.  This property is useful to determine if you are on the first or last result.

Accessing Managed Properties

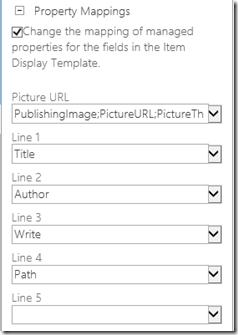
The basics of retrieving values of managed properties is accessing managed properties.  You can do this in two ways by using the managed property name or the display name in the ManagedPropertyMapping element of the display template.  You’ll find your managed properties typically in a format like the one below with the display property on the left and the managed property name on the right.  The value in brackets is optional and is used by the Content Search web part and it's what the web part shows in the property mapping section as a label.
'Line 1'{Line 1}:'Title'
ContentSearchPropertyMappings
Get Property Value by Managed Property Name
ctx.CurrentItem.LastModifiedTime
Your managed properties that you define in the ManagedPropertyMappings will show up as typed properties that you can access directly from the ctx object.  The example above display the last modified time.  Remember you can display a field from inside the HTML markup with the _#= =#_ markup.
_#= ctx.CurrentItem.LastModifiedTime =#_
Get Property Value by Display Name
var line4value = $getItemValue(ctx, "Line 4");
You can also use $getItemValue to get the value of a property using the web part display name (the value in the brackets).  This is good for the content search web part where you don't know what managed property the user has mapped to your column.  For example, in the screenshot above if I request Line 4, it will provide me the value of the Path managed property.

Useful Properties

There are a number of properties that might be useful to you if you plan on working with the JavaScript object model.  For example, add the following to your ManagedPropertyMapping element to get the id of the list, list item id, and site collection URL.
'ListItemID':'ListItemID','ListID':'ListID','SPSiteUrl':'SPSiteUrl'
Get the host list id
var listId = ctx.CurrentItem.ListID;
This will retrieve the GUID of the list containing the item.
Get the list item id
var listItemId = ctx.CurrentItem.ListItemID;
This will return the numeric list item id of the list item.  This returns the integer value as opposed to the GUID.
Get the site collection URL
var siteCollectionUrl = ctx.CurrentItem.SPSiteUrl;
The site collection URL is available with the SPSiteUrl managed property.  If you need access to the site (web) instead of the site collection, the process is a little bit more involved.
Get the file extension
ctx.CurrentItem.FileExtension
This lets you get the file extension of the current item.  Many of the helper functions use this to determine the type of document.

Including External Scripts and Style sheets

Since display templates are just HTML and JavaScript, you may want to reference external script files such as jQuery.  You can also reference CSS files as well.  You need to put these references in a <script> element block of your display template.
Include an external script
$includeScript(this.url, "~sitecollection/_layouts/15/reputation.js");
You can reference external scripts using a relative URL as shown above.  This example pulls the script out of the current site collection.  The first parameter to $includeScript is always this.url.
$includeScript(this.url, https://ajax.aspnetcdn.com/ajax/jquery/jquery-2.1.0.min.js);
You can also specify an absolute URL including those residing externally on a CDN. 
You can also load scripts using SP.SOD as well if you prefer.  Some recommend this approach over $includeScript as it is supposed to be synchronous where $includeScript is not.
Including a style sheet (CSS)
$includeCSS(this.url, "~sitecollection/site/library/mycustom.css");
Referencing a style sheet looks similar to referencing a script.

Key Building Blocks

When it comes to working with display templates, many of the things that you need to do must be executed after the rest of the script has rendered.  This especially applies for anything that modifies the DOM.  Refer to the four tips for using jQuery post for more details.   We use Post Render Callbacks to execute code after the display template is done rendering.  Think of these as your jQuery equivalent to $(document).ready().  There are two ways to make this happen.  The first is ctx.OnPostRender.push().
ctx.OnPostRender = [];
ctx.OnPostRender.push(ctx, function () {
    // do something
});
The first statement clears the array and the second one pushes your function onto it.  This means you can have multiple OnPostRender event handlers. Instead, you may want to use AddPostRenderCallback
AddPostRenderCallback(ctx, function () {     // do something
});
If you look at the out-of-the-box templates, you'll see them executed both ways.  I tend to prefer the latter technique.
Get a ClientContext object
Srch.ScriptApplicationManager.get_clientRuntimeContext();
This will return a ClientContext object for the site hosting the search component.  If you are looking to get a ClientContext object for the site hosting the search result, see this post.

Working with the DOM

You'll often need to keep track of some element Ids when working with display templates.  A common practice is to generate a unique base id for the containing div element and then appending strings to those ids for child elements.  This often happens at the begging of every display template and then the markup references these ids.  Let's look at some examples.
Creating a unique element id for a child element
var id = ctx.ClientControl.get_nextUniqueId();
One of the first lines of script you will find in a display template is this one.  It generates a unique id that will be assigned to the first div element.  You'll then see another line such as this when is actually used by the first div element.
var itemId = id + Srch.U.Ids.item;
The div element uses $htmlEncode (which we'll cover below) to html encode the id.
<div id="_#= $htmlEncode(itemId) =#_" name="Item" data-displaytemplate="DefaultItem" class="ms-srch-item" onmouseover="_#= ctx.currentItem_ShowHoverPanelCallback =#_" onmouseout="_#= ctx.currentItem_HideHoverPanelCallback =#_">
What do these ids look like?  Here is an example.
ctl00_ctl53_g_f59f896a_d82a_4957_acea_90abc7a9b86e_csr1
Getting the id of the div of the display template
ctx.ClientControl.get_id();
This will return the base id of the display template.

Utility Functions

You'll find a number of useful functions in the Srch.U object for everything from checking for null to manipulation of strings.  A lot of this overlaps with jQuery but there are some other search specific functions.  In the out-of-the-box display templates you'll sometimes see these methods referenced with Srch.U or with an alias using the $ sign.  Take a look at our first example.
Checking for null
if (!$isNull(ctx.ClientControl))
{
    // do something
}
The above use of $isNull will execute the code in the if statement if the object is not null.  The code snippet below using Srch.U.n will also do the same thing.
if (!Srch.U.n(ctx.ClientControl))
{
    // do something
}
Checking for an empty string
if (!$isEmptyString(ctx.CurrentItem.DisplayAuthor)) { }
You can use $isEmptyString or Srch.U.e to check if a string is empty.
Checking if an array is empty
if ($isEmptyArray(myArray)) { }
To determine if an array is empty $isEmptyArray.
Getting an array from multi-value fields such as author
var authors = Srch.U.getArray(ctx.CurrentItem.DisplayAuthor);
The Srch.U.getArray method is handy because it knows how to split common multi-value fields such as author.  It has a list of known delimeters such as ",#", "|", and ";".
Check if the item is a web page
ctx.CurrentItem.csr_ShowViewLibrary = !Srch.U.isWebPage(ctx.CurrentItem.FileExtension);
This method knows extensions for common page types and will return true if the extension is a page (i.e.: .aspx or .html).
Get a friendly name for a file extension
Srch.U.getFriendlyNameForFileExtension(ctx.CurrentItem.FileExtension);
This method is how search displays the word PowerPoint instead of PPTX.
Get the Display Name from an author field
var author = Srch.U.getDisplayNameFromAuthorField(ctx.CurrentItem.AuthorOWSUSER);
This function will display the author's full name properly.
Setting the icon
ctx.CurrentItem.csr_Icon = Srch.U.getIconUrlByFileExtension(ctx.CurrentItem);
This allows you to override the icon for a given item result.  You can call Srch.U.getIconUrlByFileExtension() if you want to get the icon for the given file type.
Get the number of items
ctx.ClientControl.get_numberOfItems();
You can get the number of items returned using ctx.CurrentItem.get_numberOfItems().
Determine if the host is SharePoint Foundation
if (!Srch.U.isSPFSKU()) { }
Some functionality isn't available in SPF, use this method to determine your version.

Formatting

The Srch.U class has a number of methods that make formatting values easier.  Besides just the basic formatting, it has formatting methods for numbers, dates, and file sizes that are more human readable such as display "5 MB" instead of "5,000,000 bytes".  These method are locale aware so they should display your data in the correct format for the user.
Formatting the date with a short pattern
Srch.U.toFormattedDate(ctx.CurrentItem.Write, 'ShortDatePattern');
By default, this will use LongDatePattern if you don't specify a date pattern. 
Formatting numbers
Srch.U.toFormattedNumber(value, 3);
This formats the number with three decimal places if you are passing it a decimal number.
Format the number using approximations
Srch.U.toFriendlyNumber(value);
This is useful for numbers in the 1,000 range and greater.  It rounds down to the nearest thousand.  For example, 52,343 will be returned as "52,000+".  If the value is greater than 100,000, it will return a value of 100,000+.
Format file sizes
Srch.U.toFileSizeDisplay(ctx.CurrentItem.FileSize, false);
This will return the file size in GB, MB, or KB.  You can optionally have it show the decimal part with the second parameter.
Formatting a string
var myString = String.format('Hello World {0} {1}', value1, value2);
String formatting is available just like you would use in C#.
Truncate a URL
Srch.U.truncateUrl(ctx.CurrentItem.Path, 40);
Want to display a truncated path like you see in the search results.  This method is how it is done.  You can specify the number of characters in length you want it with the second parameter.
Trim a string
Srch.U.getTrimmedString(string, 40);
Use this to trim a long string.  An ellipsis (...) will be added to the end of the string past the cutoff (second parameter)
Trim Spaces
Srch.U.trimExtraSpaces(string);
This method is handy to trim spaces from a string.

Localization

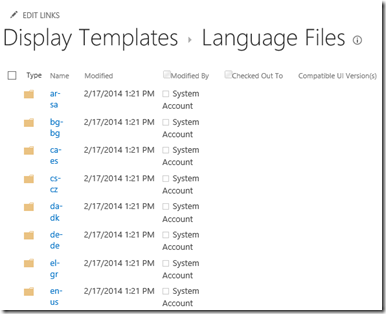
Display templates have built-in support for providing localization.  It uses a system of resource dictionary stored in JavaScript files located in culture specific folders.  Each culture specific folder contains a file CustomStrings.js.  You can use this file or include your own.  
DisplayTemplateLanguageFiles
Registering a resource dictionary
If you look inside CustomStrings.js you will see the syntax of adding resources using a simple array with $registerResourceDictionary.
$registerResourceDictionary("en-us", {
    "sampleCustomStringId": "Sample custom string",
    "rf_RefinementTitle_ManagedPropertyName": "Sample Refinement Title for ManagedPropertyName"
});
Loading a resource file
Many out-of-the-box templates load a resource file automatically using the statement below.  If not, you can add it yourself or modify it if you are using a different resource dictionary.
$includeLanguageScript(this.url, "~sitecollection/_catalogs/masterpage/Display Templates/Language Files/{Locale}/CustomStrings.js");
Using a resource
Using a resource in your display template is quite easy using $resource.  It's a good idea to make use of $htmlEncode to encode it before writing it.
_#= $htmlEncode($resource("sampleCustomStringId")) =#_