Wednesday, May 27, 2015

Sharepoint 2013 Create a Custome Master Page based on Seattle.master

Create a new project:


Configure as a Sandbox or Farm  Solution:

https://raquelalineblog.files.wordpress.com/2013/04/branding11.png

Add a new Module to your project:

https://raquelalineblog.files.wordpress.com/2013/04/branding21.png

Download a copy of Seattle.master:
https://raquelalineblog.files.wordpress.com/2013/04/branding3.png

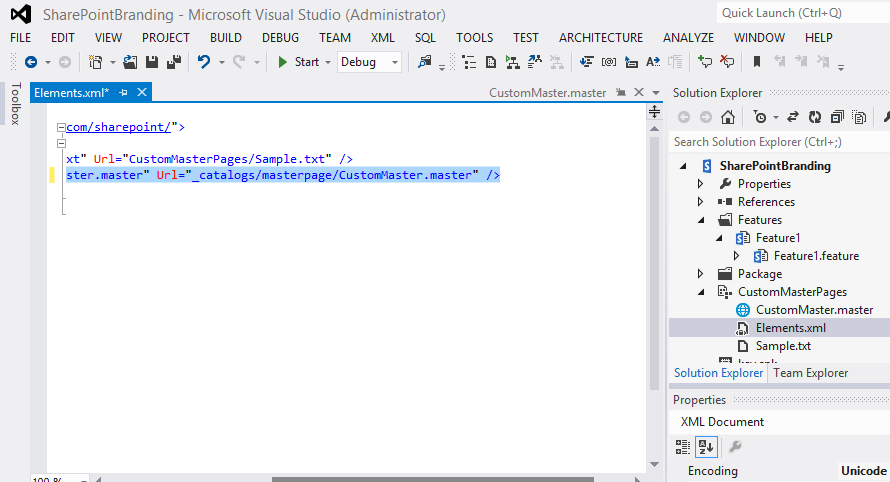
Add the copy to your module, rename to CustomMaster.master, and Change your elements.xml file to point to _catalogs\masterpage folder:

https://raquelalineblog.files.wordpress.com/2013/04/branding4.png

Change your masterpage, to include a welcome message:

https://raquelalineblog.files.wordpress.com/2013/04/branding7.png

Deploy your solution and change your Site master page:

https://raquelalineblog.files.wordpress.com/2013/04/branding5.png

Verify that it shows your welcome message:

https://raquelalineblog.files.wordpress.com/2013/04/branding6.png

Thursday, May 21, 2015

Show Multiple Columns like table in Content Query Web Part in SharePoint 2013

Showing multiple columns in content query web part was what I was working on this week in our SharePoint 2013 environment.
This post is a quick summery of what I learned through the whole work.
  1. My platform is SharePoint 2013
  2. I’m using content type syndication, so the hub is another site collection and in a second site collection I’m going to use CQWP based on a specific content type with its own site columns
  3. Step1, to know what itemstyle.xsl is and how it works. then customize it
  4. step2, to know what ContentQueryMain.xsl is and how it works, then customize it
  5. A trick to insert CQWP on your SharePoint web page
For this search for the following lines


<xsl:call-template name="OuterTemplate.CallItemTemplate">
   <xsl:with-param name="CurPosition" select="$CurPosition" />
</xsl:call-template>
And change it to:


<xsl:call-template name="OuterTemplate.CallItemTemplate">
    <xsl:with-param name="CurPosition" select="$CurPosition" />
    <xsl:with-param name="LastRow" select="$LastRow" />
</xsl:call-template>
Now that we pass the parameter we also have to change the template to accept the parameter.
Go to lines and you see the “CallItemTemplate”. Copy the second line and past it directly beneath it and make it look like this:


<xsl:template name="OuterTemplate.CallItemTemplate">
<xsl:param name="CurPosition" />
<xsl:param name="LastRow" />
Because we want to use this within our custom item template we also have give the parameter through to the template by adding a when statement just before the <xsl:otherwise> within the CallItemTemplate:


<xsl:when test="@Style='ProjectsReport'">
 <xsl:apply-templates select="." mode="itemstyle">
  <xsl:with-param name="CurPos" select="$CurPosition" />
  <xsl:with-param name="Last" select="$LastRow" />
 </xsl:apply-templates>
</xsl:when>
In this statement we specify that it only has to pass-through the parameter when the item template is ProjectsReport. So our custom template is going to be called “ProjectsReport”.

and my final custom code is like this. I tried to use SharePoint light banded rows style to have a better view. Don’t forget there’s a little customize for ContentMainQuery.xsl as mentioned above.


<xsl:template name="ProjectsReport" match="Row[@Style='ProjectsReport']" mode="itemstyle">
    <xsl:param name="CurPos" />
    <xsl:param name="Last" />   
<xsl:variable name="tableStart">
      <xsl:if test="$CurPos = 1">
       <![CDATA[
        <table width="100%" class="ms-rteTable-6" cellpadding="1" cellspacing="0">
         
<tr class="">
            <th class="">Name</th>
            <th class="">Client</th>
            <th class="">Status Summary</th>
            <th class="">Project Phase</th>
            <th class="">This Reporting Period</th>
            <th class="">Next Reporting Period</th>
            <th class="">Key Issues and Risks</th>
          </tr>]]>  
      </xsl:if>
    </xsl:variable>
  
    <xsl:variable name="tableEnd">
      <xsl:if test="$CurPos = $Last">
        <![CDATA[ </table> ]]>
      </xsl:if>
    </xsl:variable>
    <xsl:variable name="rowStart">
        <xsl:if test="$CurPos mod 2 = 0">
            <![CDATA[
              <tr class="ms-rteTableEvenRow-6">
            ]]>
        </xsl:if>
        <xsl:if test="$CurPos mod 2 != 0">
            <![CDATA[
              <tr class="ms-rteTableOddRow-6">
            ]]>
        </xsl:if>
    </xsl:variable>
    <xsl:variable name="rowEnd">
               <![CDATA[
              </tr>
            ]]>
    </xsl:variable>
    <xsl:value-of select="$tableStart" disable-output-escaping="yes"/>
    <xsl:value-of select="$rowStart" disable-output-escaping="yes"/>
        <td>
            <xsl:value-of select="@ProjectName" />
        </td>
        <td>
            <xsl:value-of select="@ProjectClient" />
        </td>
        <td>
            <xsl:value-of select="@StatusSummary" disable-output-escaping="yes" />
        </td>
        <td>
            <xsl:value-of select="@ProjectPhase" />
        </td>
        <td>
            <xsl:value-of select="@ThisReportingPeriod" disable-output-escaping="yes" />
        </td>
        <td>
        <xsl:value-of select="@NextReportingPeriod" disable-output-escaping="yes" />
        </td>
        <td>
            <xsl:value-of select="@KeyIssuesRisks" disable-output-escaping="yes" />
        </td>
    <xsl:value-of select="rowEnd"/>
    <xsl:value-of select="$tableEnd" disable-output-escaping="yes"/>
</xsl:template>


Use PowerShell to Reset to Site Definition in SharePoint Server 2013

  1. Browse to the Site Settings page for the site (e.g. http://cyclops/sites/Demo/_layouts/settings.aspx).
  2. On the Site Settings page, in the Site Actions section, click Reset to site definition.
  3. On the Reset Page to Site Definition Version page, click the option to Reset all pages in this site to site definition version, and then click Reset.
Today, I was about to perform this process manually on several sites, but then I decided to spend a few minutes exploring the Reset Page to Site Definition Version page (e.g.http://cyclops/sites/Demo/_layouts/reghost.aspx).
That's when I discovered the SPWeb.RevertAllDocumentContentStreams method. [I'm actually a little embarrassed that I wasn't aware of this little gem before. A few years ago, while working on the Agilent Technologies project, I'd used some custom C# to reghost specific pages (to resolve deployment issues), but I clearly recall some general "wonkiness" with it. If I'd known about the RevertAllDocumentContentStreamsmethod a few years ago, I probably would have just run that as part of each and every deployment ;-) ]
Anyway, once you know about the method, it's very easy to call it from PowerShell.
Here's a little script to reset all pages in a list of sites to the site definition version:
$sitesToReset =
    @(
        "http://cyclops/sites/AdventureWorks",
        "http://cyclops/sites/Demo",
        "http://cyclops/sites/Toolbox"
    )

$sitesToReset |
    ForEach-Object {
        $DebugPreference = "SilentlyContinue"
        $web = Get-SPWeb $_

        $DebugPreference = "Continue"
        
        Write-Debug "Reghosting all pages in site ($($web.Url))..."
        $web.RevertAllDocumentContentStreams()
        $web.Dispose()
    }

Perform a SharePoint 2013 site collection upgrade with PowerShell

I gave a talk about PowerShell in SharePoint 2013.  In that talk I upgraded a SharePoint 2010 site collection to SharePoint 2013.  I wanted to follow-up with a blog post showing the steps involved.  To begin the process, I have restored a copy of my content database from my SharePoint 2010 environment on the SQL Server for my SharePoint 2013 environment.  The first thing we need to do is mount the content database with Mount-SPContentDatabase. In SharePoint 2010, this process would actually update the database and perform the upgrade.  Now, it actually just attaches the database but leaves the site running in SharePoint 2010 mode.  Effectively you are running a full copy of SharePoint 2010 inside SharePoint 2013.  You can do this and upgrade each site collection one at a time to make the transition process a bit easier. 
Typically, when you are doing this, you’ll execute Test-SPContentDatabase first and resolve any reported issues.  Just like in SharePoint 2010, you need to install all of your customizations via solution package prior to mounting.  Test-SPContentDatabase can help you find some of these customizations if they are missing.  For simplicity, I am going to leave that out of my example today.  Mount-SPContentDatabase typically takes two parameters:  the name of the database and the URL of the Web Application to bind it to.  Here is what the command looks like.

Mount-SPContentDatabase –Name DatabaseName –WebApplication http://server
When it runs, you’ll see a progress indicator.

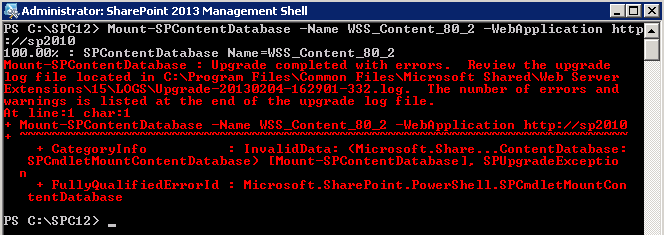
MountSPContentDatabaseProgress
When it finishes, you’ll likely have errors.  You can track them down and re-mount.  More than likely you’ll always have some kind of error regardless of how hard you try.
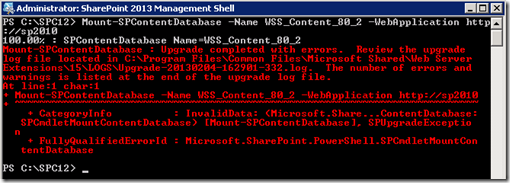
MountSPContentDatabaseCompleteWithErrors

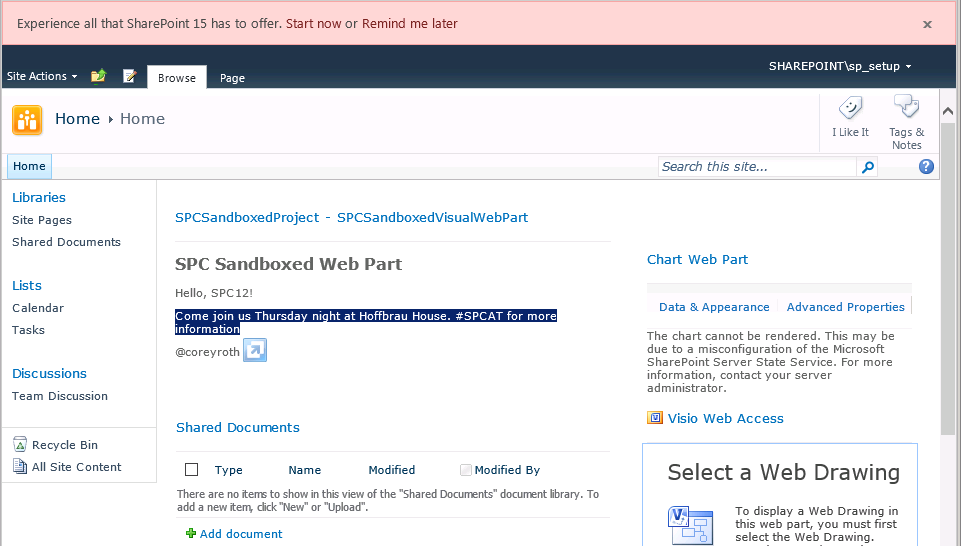
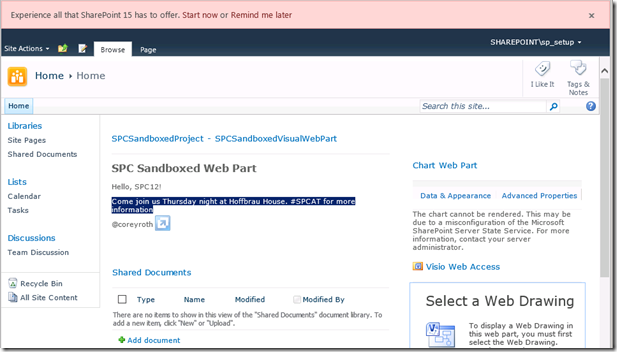
Now you can go to the site in your web browser.  You’ll see your existing site running in SharePoint 2010 mode along with a banner prompting to start the site collection upgrade process.
UpgradeSharePoint2010Mode

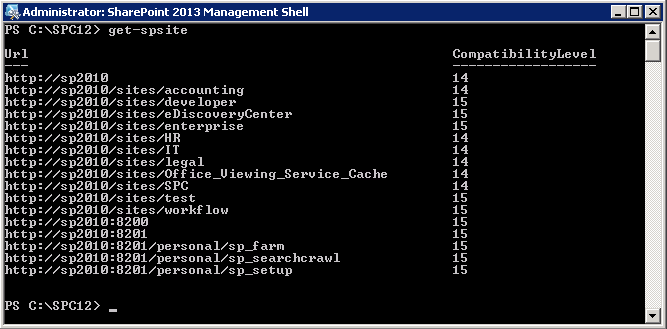
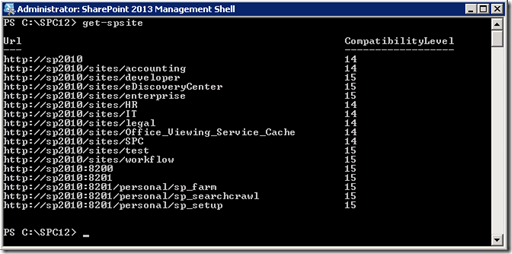
You can start the upgrade process right there in the browser, but we want to use PowerShell.   We can see the upgrade status of our site collections using Get-SPSite.  This cmdlet has been updated to show you the current version (ComaptibilityLevel) of the site collection.  A value of 14 represents SharePoint 2010 while a value of 15 represents SharePoint 2013.

Get-SPSite
PowerShellGetSPSite
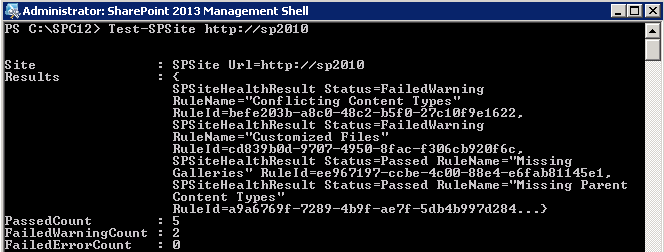
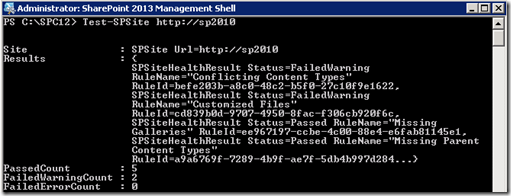
To upgrade a site collection, test it out first using Test-SPSite.  Like Test-SPContentDatabase, this command can help you identify any particular issues.  In my case, I am going to upgrade my root site collection.

Test-SPSite http://server/sitecollection
PowerShellTestSPSite

SharePoint 2013 has a new concept for the upgrade evaluation site collection.  Effectively this process schedules a job to copy your site collection, upgrade it, and then optionally notify you (if you add the –email parameter).  You don’t have to use this, but it’s a good way to test things out if you have a tricky site with a lot of customizations.

Request-SPUpgradeEvaluationSite http://server/sitecollection
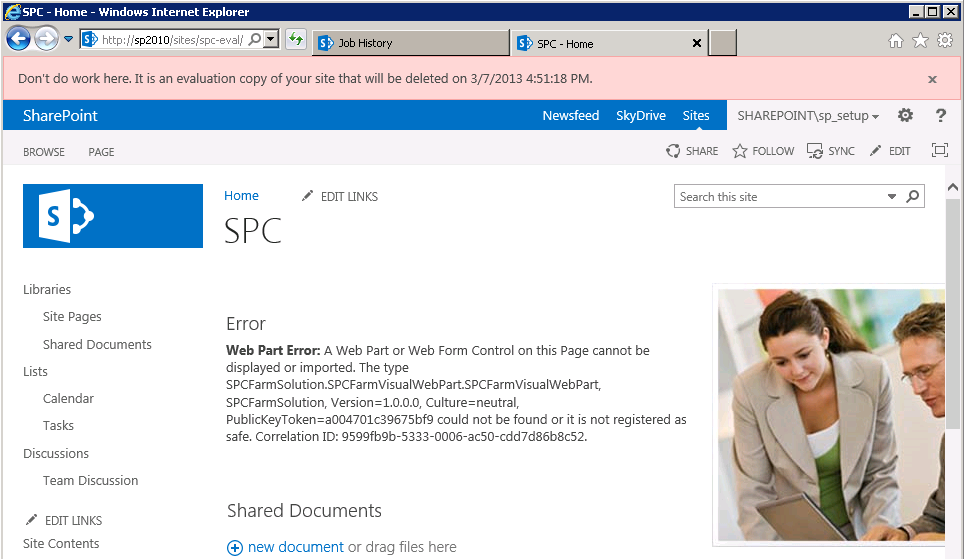
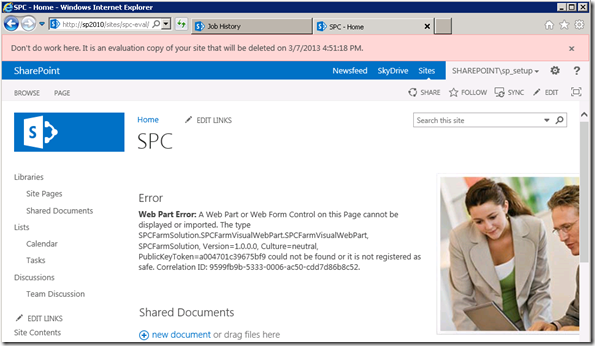
Executing the command simply returns you to a command prompt.  Later a job will fire off and create the upgrade evaluation site collection.  This appears to be controlled by the Create Upgrade Evaluation Site Collections job.  It only executes once a day so if you want to get your upgrade evaluation site faster, you can go manually run it.  After it completes, you can visit your site by appending –eval to your site collection name (i.e.: http://server/sitecollection-eval).  When you visit the site you’ll notice the warning bar at the top telling users that this is only temporary.  After 30 days or so the site will get deleted automatically.
UpgradeEvaluationSiteCollection

As you see I have an error in a web part that I need to correct.  This is why upgrade site collections can be useful in finding issues before cutting over.
Let’s upgrade out site collection directly now.  I only received warnings from Test-SPSite so I am going to proceed with the upgrade and assume everything is going to work fine. :)  We use Upgrade-SPSite to make this happen.  Pass the URL to the site collection and be sure and include –VersionUpgrade.  It won’t upgrade to the new version if you leave off that parameter.

Upgrade-SPSite http://server/sitecollection –VersionUpgrade

PowerShellUpgradeSPSiteInProgress

Depending on the size of your site collection, it may take some time.  When it finishes, you’ll see something similar to the screen below.

PowerShellUpgradeSPSiteComplete

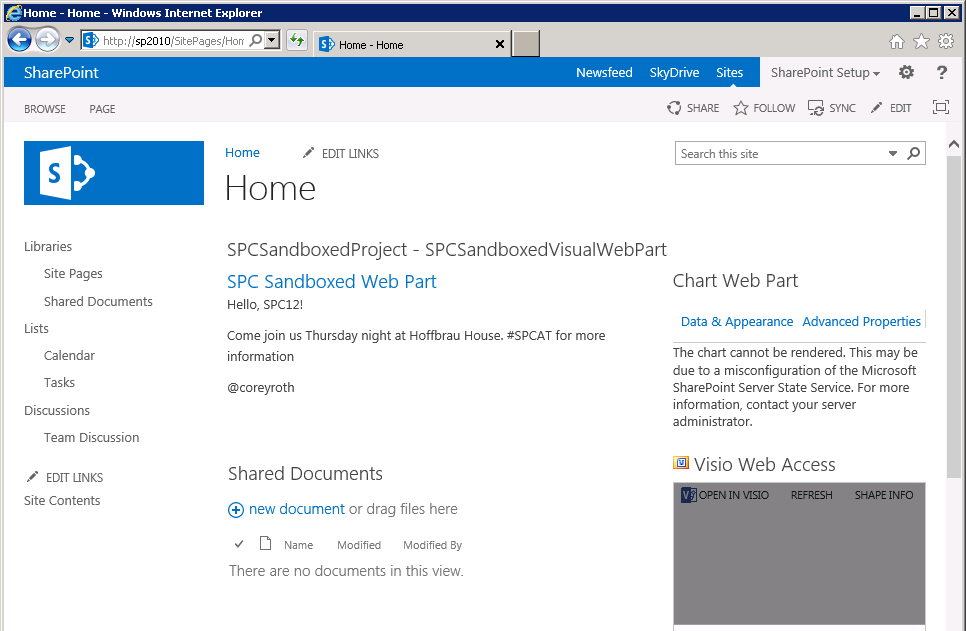
Now, we can visit our upgraded site in the browser.
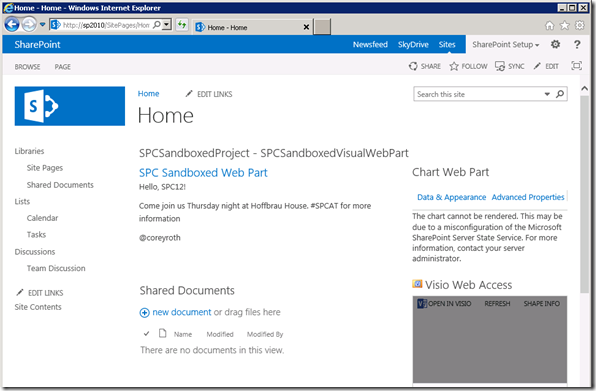
UpgradedSiteCollection

Site Collections Upgrades are a powerful new feature in SharePoint 2013 which I believe will really make the process smoother.  Keep in mind, you can also use the new Copy-SPSite cmdlet to make a copy of your site collection and perform some tests there.

Wednesday, May 20, 2015

Error in Sharepoint 2013 ,To follow documents or sites, we need to get a couple of things set up. This can take a few minutes to complete, and once it's done, you'll need to come back to this site and try following again

I have faced error when i tried to follow document by using AD Account

"To follow documents or sites, we need to get a couple of things set up. This can take a few minutes to complete, and once it's done, you'll need to come back to this site and try following again"

I have investigated about this issue and resolved by following steps

The first thing in ULS Log I noted was:
<date/time> w3wp.exe (0x2668)    0x1A80    SharePoint Portal Server    Personal Site Instantiation    af1lc    High    Skipping creation of personal site from MySitePersonalSiteUpgradeOnNavigationWebPart::CreatePersonalSite() because one or more of the creation criteria has not been met. [SPWeb Url=http://my/Person.aspx?accountname=CONTOSO\user5]  http://my/Person.aspx?accountname=CONTOSO\user5]Self-Service Site Creation == False  Can Create Personal Site == True  Is user licensed == True  Storage&Social UPA Permission == True  Site or Page or Web Part is in design mode == False      c7d7de9b-bf6b-1084-5706-a8b8f278e6c3

So I have enabled Self-Service Site Creation ==True   in Web Application level click Self Service Site Creation and enabled the property Self Site Creation property
Second issue happens for the user whose value personal site capabilities shows “0” and in order to have feeds and other featured working we need the value as “14” by doing i am able to solve issue.


Newsfeed Error - A Required SharePoint Feature is not enabled in SharePoint 2013

There was a recent issue when a User clicks on the newsfeed there is nothing there, when they switch from following to everyone they following error is displayed and also when user click on about me
"SharePoint returned the following error: A required SharePoint feature is not enabled. Internal type name: Microsoft.Office.Server.Microfeed.MicrofeedException. Internal error code: 46. Contact your system administrator for help in resolving this problem."
When I go to "about me" it still states "We're almost ready" underneath my Bio, and if I goto tasks "something went wrong" when it tries to load the page
The errors I still see are as follows
in the Application Log:
This appears intermitantly
"The Execute method of job definition Microsoft.Office.Server.UserProfiles.LMTRepopulationJob (ID 8e2b6939-813f-4798-b473-37b891a4ad2d) threw an exception. More information is included below.
Unexpected exception in FeedCacheService.IsRepopulationNeeded: Connection to the server terminated,check if the cache host(s) is running ."

Resolution:
Issue happens for the user whose value personal site capabilities shows “0” and in order to have feeds and other featured working we need the value as “14”
To fix the issue we need to follow either of  below action plan.
1) This can be done - user profile service application - mange user profiles -> search for the user -> look for personal site capabilities and update the value to 14 and save it.
or
2) I have a PowerShell which can help us to update affected users values form 0 to 14.
#Set up default variables
#My Site URL
$mySiteUrl = "http://spf1/my/"
#The part of the picture URL you are trying to find
$currentValue = "0"
#The value that will replace the above
$newValue = "14"
#The internal name for Property
$upAttribute = "SPS-PersonalSiteCapabilities"
#Get site objects and connect to User Profile Manager service
$site = Get-SPSite $mySiteUrl
$context = Get-SPServiceContext $site
$profileManager = New-Object Microsoft.Office.Server.UserProfiles.UserProfileManager($context)
$profiles = $profileManager.GetEnumerator()
foreach ($userProfile in $profiles)
{
if ($userProfile[$upAttribute].toString() -ne 14 )
{
if ($userProfile.AccountName -like "i:0#.f|ldapmember|achavda")
    {
                         $newvalue = $userProfile[$upAttribute].toString()
             $newvalue = $newvalue.Replace($currentURLValue, $newURLValue)
              $userProfile[$upAttribute].Value = $newvalue
             $userProfile.Commit()
            }
}
}

Thursday, March 5, 2015

An unknown exception occurred while executing a sandboxed code solution request in the worker process.\r\n|0

Summary : SharePoint 2013 Error – An unknown exception occurred while executing a sandboxed code solution request in the worker process.\r\n|0,Error adding Sandbox solutions in SharePoint 2013, Error Creating Sandbox Visual WebPart on Windows 2012 + SharePoint 2013 + Domain Controller
Today while Creating a Sandbox WebPart using the new Visual WebPart Template of Visual studio 2012 I encountered the following error, while adding the webpart on SharePoint 2013 site page.
Error – “An unknown exception occurred while executing a sandboxed code solution request in the worker process.\r\n|0″
 SharePoint 2013 Error - An unknown exception occurred while executing a sandboxed code solution request in the worker process.\r\n|0
The Webpart didn’t had much of a code to generate any error so the first thing I did was to look at the account used for Sandbox service running on the farm.The account looked ok and had proper permissions to the web application that I was deploying to.So the next thing I did was to google the error and see if anyone had an similar issue like that :)
Well to my surprise there was not much on the web about it but I still got the reason for the occurrence of this error. The reason for my error was that SharePoint 2013 does not support installation on to a domain controller which in fact was my setup for the environment. I had SharePoint 2013 + Domain Controller on Windows 2012.
Unfortunately there is no way to fix this error other than creating an environment with a Domain on a separate server than SharePoint 2013. Read more about this on the technet article below –
http://technet.microsoft.com/en-us/library/ee667264.aspx