I gave a talk about PowerShell in SharePoint 2013. In that talk I
upgraded a SharePoint 2010 site collection to SharePoint 2013. I wanted
to follow-up with a blog post showing the steps involved. To begin the
process, I have restored a copy of my content database from my
SharePoint 2010 environment on the SQL Server for my SharePoint 2013
environment. The first thing we need to do is mount the content
database with Mount-SPContentDatabase.
In SharePoint 2010, this process would actually update the database and
perform the upgrade. Now, it actually just attaches the database but
leaves the site running in SharePoint 2010 mode. Effectively you are
running a full copy of SharePoint 2010 inside SharePoint 2013. You can
do this and upgrade each site collection one at a time to make the
transition process a bit easier.
Typically, when you are doing this, you’ll execute Test-SPContentDatabase first and resolve any reported issues. Just like in SharePoint 2010, you need to install all of your customizations via solution package prior to mounting. Test-SPContentDatabase can help you find some of these customizations if they are missing. For simplicity, I am going to leave that out of my example today. Mount-SPContentDatabase typically takes two parameters: the name of the database and the URL of the Web Application to bind it to. Here is what the command looks like.
Mount-SPContentDatabase –Name DatabaseName –WebApplication http://server
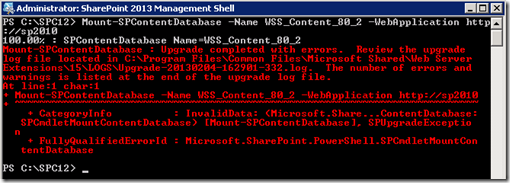
When it runs, you’ll see a progress indicator.

When it finishes, you’ll likely have errors. You can track them down and re-mount. More than likely you’ll always have some kind of error regardless of how hard you try.
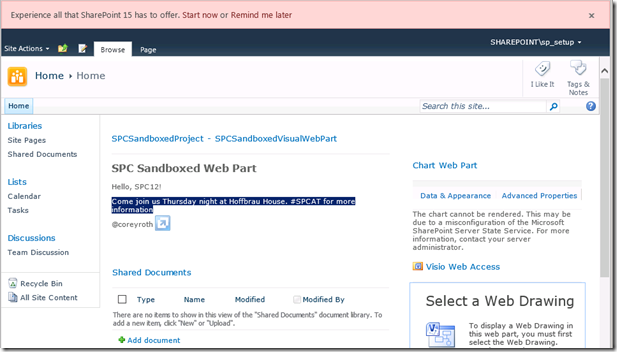
Now you can go to the site in your web browser. You’ll see your existing site running in SharePoint 2010 mode along with a banner prompting to start the site collection upgrade process.
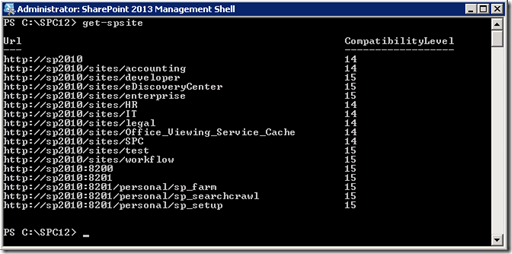
You can start the upgrade process right there in the browser, but we want to use PowerShell. We can see the upgrade status of our site collections using Get-SPSite. This cmdlet has been updated to show you the current version (ComaptibilityLevel) of the site collection. A value of 14 represents SharePoint 2010 while a value of 15 represents SharePoint 2013.
Get-SPSite
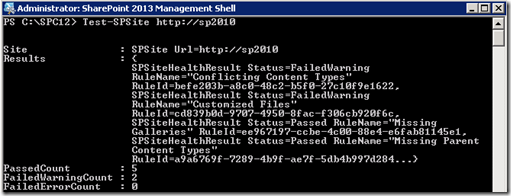
To upgrade a site collection, test it out first using Test-SPSite. Like Test-SPContentDatabase, this command can help you identify any particular issues. In my case, I am going to upgrade my root site collection.
Test-SPSite http://server/sitecollection
SharePoint 2013 has a new concept for the upgrade evaluation site collection. Effectively this process schedules a job to copy your site collection, upgrade it, and then optionally notify you (if you add the –email parameter). You don’t have to use this, but it’s a good way to test things out if you have a tricky site with a lot of customizations.
Request-SPUpgradeEvaluationSite http://server/sitecollection
Executing the command simply returns you to a command prompt. Later a job will fire off and create the upgrade evaluation site collection. This appears to be controlled by the Create Upgrade Evaluation Site Collections job. It only executes once a day so if you want to get your upgrade evaluation site faster, you can go manually run it. After it completes, you can visit your site by appending –eval to your site collection name (i.e.: http://server/sitecollection-eval). When you visit the site you’ll notice the warning bar at the top telling users that this is only temporary. After 30 days or so the site will get deleted automatically.
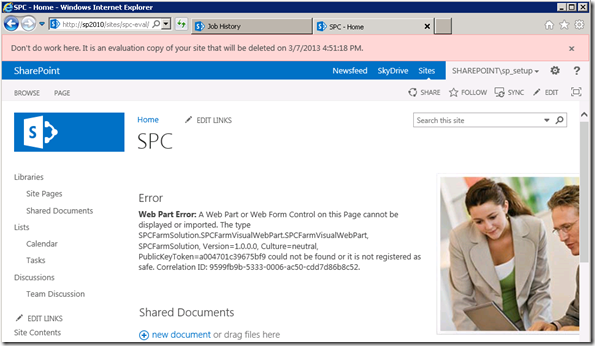
As you see I have an error in a web part that I need to correct. This is why upgrade site collections can be useful in finding issues before cutting over.
Let’s upgrade out site collection directly now. I only received warnings from Test-SPSite so I am going to proceed with the upgrade and assume everything is going to work fine. :) We use Upgrade-SPSite to make this happen. Pass the URL to the site collection and be sure and include –VersionUpgrade. It won’t upgrade to the new version if you leave off that parameter.
Upgrade-SPSite http://server/sitecollection –VersionUpgrade

Depending on the size of your site collection, it may take some time. When it finishes, you’ll see something similar to the screen below.

Now, we can visit our upgraded site in the browser.
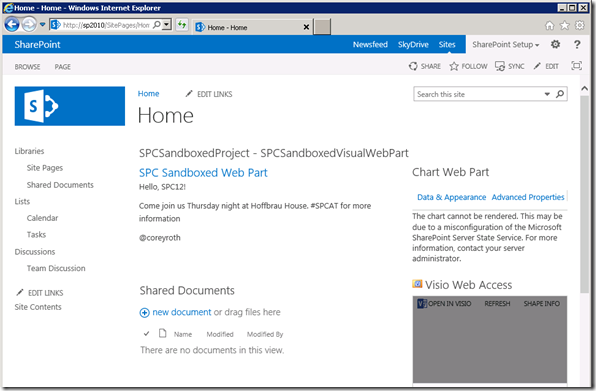
Site Collections Upgrades are a powerful new feature in SharePoint 2013 which I believe will really make the process smoother. Keep in mind, you can also use the new Copy-SPSite cmdlet to make a copy of your site collection and perform some tests there.
Typically, when you are doing this, you’ll execute Test-SPContentDatabase first and resolve any reported issues. Just like in SharePoint 2010, you need to install all of your customizations via solution package prior to mounting. Test-SPContentDatabase can help you find some of these customizations if they are missing. For simplicity, I am going to leave that out of my example today. Mount-SPContentDatabase typically takes two parameters: the name of the database and the URL of the Web Application to bind it to. Here is what the command looks like.
Mount-SPContentDatabase –Name DatabaseName –WebApplication http://server
When it runs, you’ll see a progress indicator.

When it finishes, you’ll likely have errors. You can track them down and re-mount. More than likely you’ll always have some kind of error regardless of how hard you try.

Now you can go to the site in your web browser. You’ll see your existing site running in SharePoint 2010 mode along with a banner prompting to start the site collection upgrade process.

You can start the upgrade process right there in the browser, but we want to use PowerShell. We can see the upgrade status of our site collections using Get-SPSite. This cmdlet has been updated to show you the current version (ComaptibilityLevel) of the site collection. A value of 14 represents SharePoint 2010 while a value of 15 represents SharePoint 2013.
Get-SPSite

To upgrade a site collection, test it out first using Test-SPSite. Like Test-SPContentDatabase, this command can help you identify any particular issues. In my case, I am going to upgrade my root site collection.
Test-SPSite http://server/sitecollection

SharePoint 2013 has a new concept for the upgrade evaluation site collection. Effectively this process schedules a job to copy your site collection, upgrade it, and then optionally notify you (if you add the –email parameter). You don’t have to use this, but it’s a good way to test things out if you have a tricky site with a lot of customizations.
Request-SPUpgradeEvaluationSite http://server/sitecollection
Executing the command simply returns you to a command prompt. Later a job will fire off and create the upgrade evaluation site collection. This appears to be controlled by the Create Upgrade Evaluation Site Collections job. It only executes once a day so if you want to get your upgrade evaluation site faster, you can go manually run it. After it completes, you can visit your site by appending –eval to your site collection name (i.e.: http://server/sitecollection-eval). When you visit the site you’ll notice the warning bar at the top telling users that this is only temporary. After 30 days or so the site will get deleted automatically.

As you see I have an error in a web part that I need to correct. This is why upgrade site collections can be useful in finding issues before cutting over.
Let’s upgrade out site collection directly now. I only received warnings from Test-SPSite so I am going to proceed with the upgrade and assume everything is going to work fine. :) We use Upgrade-SPSite to make this happen. Pass the URL to the site collection and be sure and include –VersionUpgrade. It won’t upgrade to the new version if you leave off that parameter.
Upgrade-SPSite http://server/sitecollection –VersionUpgrade

Depending on the size of your site collection, it may take some time. When it finishes, you’ll see something similar to the screen below.

Now, we can visit our upgraded site in the browser.

Site Collections Upgrades are a powerful new feature in SharePoint 2013 which I believe will really make the process smoother. Keep in mind, you can also use the new Copy-SPSite cmdlet to make a copy of your site collection and perform some tests there.
Hello. Thank you for posting this. I am having a problem with the upgrade site. The step just after mounting the DB. I successfully mount the DB. When i run Get-spsite i receive there was no endpoint listening at Http://localhost:32843/security tokenservice application/securitytoken.svc taht could accept the message. Incorrect address. I have checked the security token service and it is running.
ReplyDelete